|
|
|
 |
|
|
|
|
||
|
|
|
|
| First off let me say that I'm not offering this advice as some kind of expert but just as someone who tried to use the program and was unhappy with the results - no fault to the APCD as it is a very powerful tool. I'm also a tool but "powerful" isn't one of the words psychologists used to describe me. I couldn't get things to look anywhere close to acceptable. I suggest that (if you haven't already done so) you go to The Links Corner Tutorials at http://www.sportplanet.com/links/tutorials/ . I'm not trying to contradict anything at that site. I just adapt things to something that works for me (and my lack of skill, patience and knowledge). I'm not a course designer so I have no tips for that. I prefer to try recreate courses that I have played or would like to play. I'll leave the designing part to people who are better at it than I am (try Mike Jones' site) . That said, here's how I do things - works for me - hopefully something here helps you over a road block you may be having. Here's how I do things, in order and the rough time spent on each. When I have time, I'll add more detail (with pics) to each step. Use this at your own risk - don't try this at home kids :-) |
| 1. Shapes and Hole Layout: 1 hour per hole |
| 2. Vert Positioning: 1 hour (whole course) |
| 3. Major Elevation Work: 1 Hour (whole course) |
| 4. Elevation of Tee, Fairway and Green: 1 hour per hole |
| 5. Add Face Textures to Tee, Fairway and Green shapes: 1 1/2 hours per hole |
| 6. Add Face Textures to Bunkers (depends on #) 1 hour per hole |
| 7. Elevation of bunkers, mounds and swales: 2 hours per hole |
| 8. Elevation Tweaks: 1 hour per hole |
| 9. Repeat step 8: (seems like hours and hours) |
| 10. Planting: (see step 9) |
| 11. Custom Stuff (how many weeks behind schedule am I?) |
|
So, I spend at least 10 hours per hole - ouch - no wonder the wife wants me to get out more. That of course doesn't include the hours and hours spent "practicing" holes and trying techniques from the Links Center Tutorials. If you looking for me to give you quick fix short cuts - well, here's some general ideas that will help even if you are inserting the shapes and haven't too much of an idea of how to turn edges. |
|
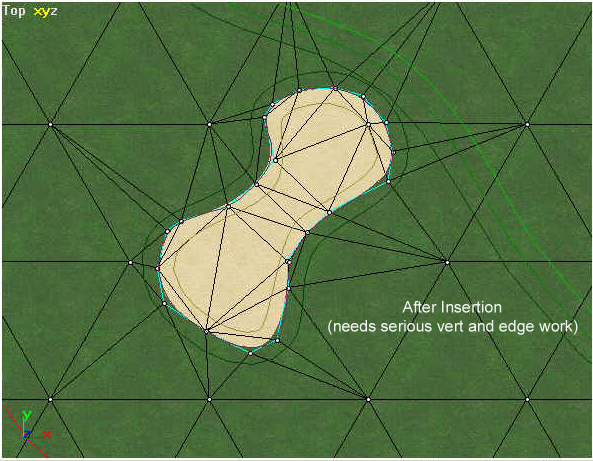
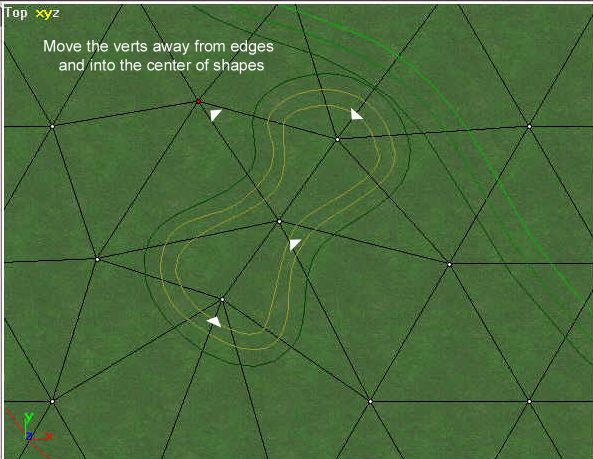
- Once you have your shapes laid out, BEFORE you insert them, move the nearest vert or verts away from the edges of the shape. Move inside or move them outside of the edge line but DON"T leave them on or too near the edge of your shape. I tried moving verts to the center of traps, greens and fairways before inserting them and it really decreased the amount of edge clean up work and dreaded overlapping verts. (that said I still think adding verts and turning edges and assigning textures rather than inserting shapes is the way to go..but) See what I mean with these pictures below. (sorry about the poor quality) |
 |
 |
 |
 |
| Still needs some work, but even left as is, this shape is much easier to work with than the first one where I didn't move the verts. Also, the "inner shape" will follow and need less clean up. If you chose to "insert" shapes then move those verts (took 10 seconds for that bunker) and save yourself a headache. See Vert Positioning above for more info. |
|
- Elevate or tilt the whole area around the fairway or green that you are working on. Otherwise you end up with some wacky sharp slopes between your fringe and green or rough and fairway. Mike Jones has an excellent tutorial on that at http://www.geocities.com/mikescourses/ . |
|
- I find that assigning different textures to "terrain contours" and doing my elevation work before inserting my shapes made it a lot easier for me to control the elevation and not miss verts here and there causing some wicked pot holes (should have left them in and called the course St Andrews.) Have a look at Major Elevation Work above for more info. |
|
-Here's a panorama to use for setting the wind or placing objects in your own custom panorama. |
 |
| You use this as a custom panorama. Use the perspective view to decide which direction you want the wind blowing plus, you can use it as a template for building you own panorama. You can see where objects will go in your pano based on the views from the course using this on. It's 16 megs (8 zipped), has an alpha, and the middle blue section acts as a 450 pixel guideline. Take the guess work out things. Click on the image to download. |